I’m planning to get my own virtual server platform installed at home for testing purposes. The easy way would be to just run the free VMware Player on the laptop but I want to play with the free VMware vSphere Hypervisor as well. Apparently vSphere Hypervisor is the engine that has been known as ESXi. Or I could be mistaken but you can always correct and enlighten me. Anyway, some posts are evidently necessary to document the actions. I will not likely publish anything totally new but apparently quite many are interested on these pieces of information as well.
My intention is to run vSphere Hypervisor on a desktop-grade PC so that the only harddisk present is used for the virtual servers (guests) and a USB stick is used for the hypervisor itself. We can call it a cheap solution!
I will start by preparing the USB stick. I’m doing this on my laptop as I don’t actually have my host platform here yet. I don’t have a CD/DVD drive at hand, and I won’t necessarily have any CD/DVD drive on the host either. So basically, I’m here just doing something and I’m not able to even test the results yet :-). I guess I’ll just fix the post later if I did something terribly wrong.
Note: I will not show here how to extract the installer ISO image on a USB stick for booting and starting the installation process from USB on the desired ESXi host. (If you want to do that please use your favorite search engine with keywords “unetbootin esxi” or something like that.)
What I will show here is how to actually install the Hypervisor on the USB stick, using a virtual machine because I don’t have the final hypervisor host hardware here yet.
Step-by-step instructions on how to install vSphere Hypervisor on an USB stick without using CD/DVD drive:
- Be sure that the computer you are working with has the VT-x feature enabled in the BIOS setup. At least that is the name of the feature on my ThinkPad T61 on which I’m working. Without that feature you cannot start 64-bit guests on the VMware Player. Or something like that, maybe it wasn’t really needed for this task but I enabled it anyway to be able to run other guests.
- Install the free VMware Player (www.vmware.com). I’m installing it over Windows 7 here. The version of Player I have is “5.0.1 build-894247”.
- Download the VMware vSphere Hypervisor (www.vmware.com) install image (ISO). For me the image name seems to be “VMware-VMvisor-Installer-5.1.0-799733.x86_64.iso”.
- Start the VMware Player and create a new virtual machine. Use the Install from: Installer disc image file (iso) option and browse for the ISO file. Player automatically detects that the operating system in the ISO image is VMware ESXi 5.
- Click Next and enter some name for the virtual machine. Also select a location for the virtual machine. The location does not matter very much (as long as there is enough disk space available) because the virtual machine can be deleted as soon as the install has been completed. The only purpose we are using the virtual machine for is to just run the Hypervisor installer and the target for the actual install will be the USB stick.
- On the next screen you can accept the default settings for the disk size (40GB) and to split the virtual disk into multiple files (again, we will delete the disk with the virtual machine later).
- Finally, in the Ready to Create Virtual Machine screen you can see the settings for the virtual machine. The default settings work just fine (two CPUs, two gigs of RAM).
- When clicking Finish the virtual machine will be started automatically with the ISO image acting as the boot CD drive.
- On my laptop I receive an error message “Virtualized Intel VT-x/EPT is not supported on this platform. Continue without virtualized Intel VT-X/EPT?”. I just say Yes there.
- The installer image is now started in the virtual machine. Note that you have to click on the virtual machine window to set the keyboard focus in the virtual machine to be able to move around in the boot menu with the arrow keys. Press Ctrl+Alt to get the mouse control in your host OS again.
- Here is a promising screenshot of the progress to color the post and to prove that I’m actually doing something here:
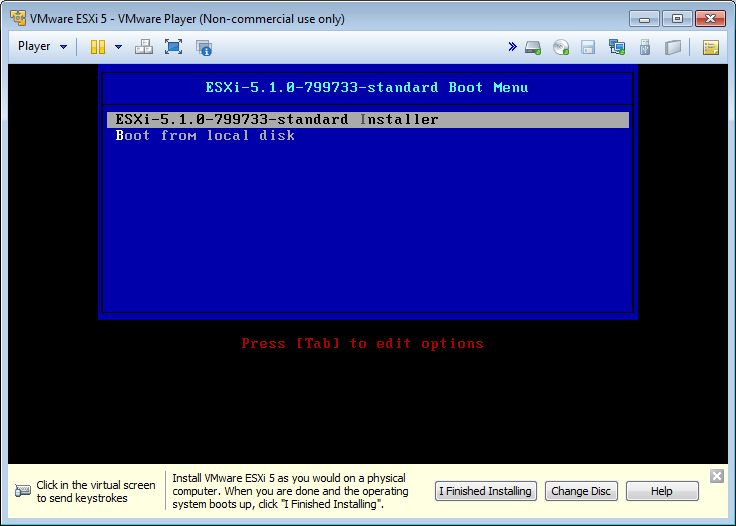
- In the boot menu, proceed with the ESXi standard installer.
- After loading some modules and doing some other internal stuff it welcomes to the installer, just continue with Enter.
- Carefully read the license as usual and accept it with F11.
- It now scans the hardware (the virtual machine) for targets where to install ESXi. At this point it only sees the local 40GB virtual disk.
- Now, connect the USB stick (minimum of 2GB I believe, or maybe 1G is enough as well) on the computer. Note that the current contents of the USB stick will be completely erased while installing ESXi so don’t expect to use it for other purposes from now on without complete repartitioning later.
- In the Player menu of the virtual machine window, go to Removable Devices – Mass Storage Device (or wherever the USB stick logically resides) and select Connect (Disconnect from host). The USB stick is now hidden from the host computer and it is attached to the virtual machine.
- Press F5 = Refresh in the virtual machine window (again, you have to click on the window to get your keystrokes there).
- Now you should see the USB stick in the Local Storage Devices list. Select it and press Enter to continue with it.
- Select the keyboard layout of your taste.
- Configure the desired root password for the platform.
- After some system scanning I get an error message again. This time it says: “Hardware virtualization is not a feature of the CPU, or is not enabled in the BIOS.” Basically this means that my laptop is not able to run nested virtual machines. Remember, the installer is now running in a virtual machine, and it detects that it is not able to create virtual machines under itself. I just ignore the message and continue with Enter because this is not my final hardware anyway.
- One more confirmation dialog is shown, I press F11 to continue because I’m confident that “mpx.vmhba33:C0:T0:L0” (as it shows to me) is the correct install target and the disk will be repartitioned. I don’t have a clue what could I see from the string but here we go.
- After some time the installation completes.
- Press Enter to initiate controlled reboot of the installer so that it can finalize everything.
- When the virtual machine reboots and starts again use the Player controls to power off the virtual machine because you don’t want it to start running from the USB stick right now. Again, this is not our intended location to actually start the Hypervisor.
- Disconnect the USB stick from the computer.
- Now the virtual machine can be deleted in the VMware Player with the Delete VM from disk right-click option because we don’t need that virtual machine anymore. If you need to later redo the USB install you can just create a new virtual machine.

Now I have the USB stick ready for my vSphere Hypervisor host. Let’s see how it works later when the computer arrives.
That’s a creative solution, Markku. I hadn’t considered this approach. Looking forward to part 2.
Hi Joel, I cannot claim the honor of being the first one thinking about using a VM for creating the USB stick. But I can tell you here that it really worked!! I started my ESXi server today, so another blog post is coming.
Thanks for writing this up, Markku! Let’s me quickly evaluate performance on different hardware.
Thank you for putting this together; it is exactly what I was looking for!