When configuring actions in Zabbix for example for problem alerts, there is a built-in method for sending email notifications. Here are the instructions for sending alerts as Twitter direct messages. These instructions are based on a Debian 8 Jessie installation where Zabbix has been installed from the packages in the Zabbix repository.
- You maybe want to send the DMs from a separate Twitter account, so go ahead to https://twitter.com/ and create a new Twitter account for sending the DMs
- Please note that in order to send Twitter DMs the receiver needs to follow you, so go ahead to your own personal Twitter account (or to whatever account you want to receive the alerts) and follow the new sender account that you just created
- Install Twidge:
markku@Zabbix:~$ sudo apt-get install twidge
Reading package lists... Done
Building dependency tree
Reading state information... Done
The following NEW packages will be installed:
  twidge
0 upgraded, 1 newly installed, 0 to remove and 0 not upgraded.
Need to get 1,344 kB of archives.
After this operation, 9,539 kB of additional disk space will be used.
Get:1 http://ftp.fi.debian.org/debian/ jessie/main twidge amd64 1.1.2 [1,344 kB]
Fetched 1,344 kB in 0s (6,376 kB/s)
Selecting previously unselected package twidge.
(Reading database ... 35387 files and directories currently installed.)
Preparing to unpack .../twidge_1.1.2_amd64.deb ...
Unpacking twidge (1.1.2) ...
Processing triggers for man-db (2.7.0.2-5) ...
Setting up twidge (1.1.2) ...
markku@Zabbix:~$
- Run “twidge setup”:
markku@Zabbix:~$ twidge setup

Welcome to twidge.  We will now configure twidge for your
use with Twitter (or a similar service).  This will be quick and easy!


Please wait a moment while I query the server...


OK, next I need you to authorize Twidge to access your account.
Please cut and paste this URL and open it in a web browser:

https://api.twitter.com/oauth/authorize?oauth_token=XYZXYZXYZXYZXYZXYZ

Click Allow when prompted.  You will be given a numeric
key in your browser window.  Copy and paste it here.
(NOTE: some non-Twitter services supply no key; just leave this blank
if you don't get one.)

Authorization key:
- As instructed, open your browser and copy&paste the API link shown by Twidge setup in the browser (while logged in to the new Twitter account)
- Accept the usage of the Twitter account by Twidge
- Copy the authorization key numbers (PIN code) from the browser and paste it to the Twidge setup prompt:
Authorization key: 9876543
Successfully authenticated!
Twidge has now been configured for you and is ready to use.
markku@Zabbix:~$
- Twidge creates the configuration file as .twidgerc (in the current user’s home directory), move it to the Zabbix alertscripts directory:
markku@Zabbix:~$ sudo mv .twidgerc /usr/lib/zabbix/alertscripts/twidgerc
markku@Zabbix:~$
- Change the permissions of the twidgerc file:
markku@Zabbix:~$ cd /usr/lib/zabbix/alertscripts/
markku@Zabbix:/usr/lib/zabbix/alertscripts$ sudo chown zabbix.zabbix twidgerc
markku@Zabbix:/usr/lib/zabbix/alertscripts$ sudo chmod 600 twidgerc
markku@Zabbix:/usr/lib/zabbix/alertscripts$ ls -l
total 4
-rw------- 1 zabbix zabbix 592 Dec 22 11:14 twidgerc
markku@Zabbix:/usr/lib/zabbix/alertscripts$
- Create the shell script for sending the alerts, let’s call it “tweetdm”, create it to the alertscripts directory with your favourite editor, with these contents:
#!/bin/bash

TO=$1
SUBJECT=$2
MESSAGE=$3
# MESSAGE is not really used here, just an example

/usr/bin/twidge -c /usr/lib/zabbix/alertscripts/twidgerc dmsend "$TO" "$SUBJECT"
- Change the script permissions:
markku@Zabbix:/usr/lib/zabbix/alertscripts$ sudo chown zabbix.zabbix tweetdm
markku@Zabbix:/usr/lib/zabbix/alertscripts$ sudo chmod 700 tweetdm
markku@Zabbix:/usr/lib/zabbix/alertscripts$ ls -l
total 8
-rwx------ 1 zabbix zabbix 175 Dec 22 11:29 tweetdm
-rw------- 1 zabbix zabbix 592 Dec 22 11:14 twidgerc
markku@Zabbix:/usr/lib/zabbix/alertscripts$
- Test your script (yourhandle = the destination Twitter account where you want to send the test message)
markku@Zabbix:/usr/lib/zabbix/alertscripts$ sudo ./tweetdm yourhandle "This is a test message"
markku@Zabbix:/usr/lib/zabbix/alertscripts$
- If your message does not get through, please check that the configuration file is in place and that you actually follow the sender account that you created in the beginning.
Now that you have the sending script prepared, you need to configure Zabbix to actually make it possible to use the mechanism.
- In Zabbix frontend console, go to Administration – Media types
- Click Create media type (in the right-hand side)
- Configure the new media type to use the “tweetdm” script:
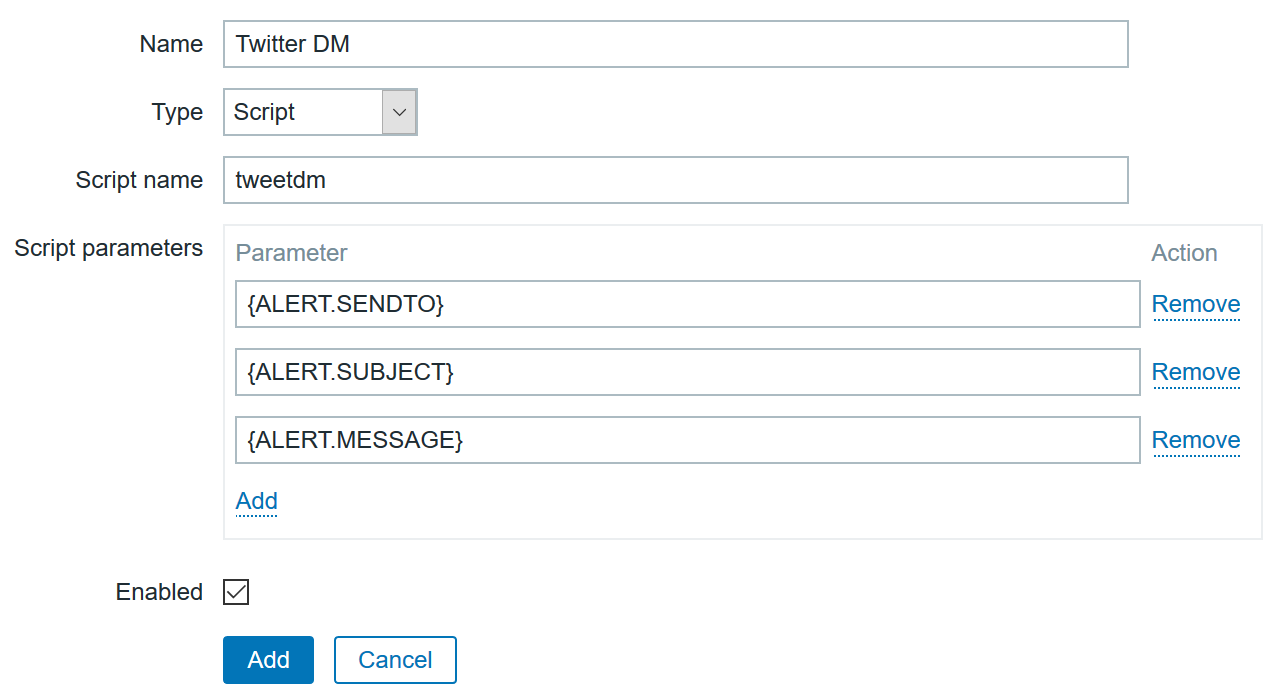
- There are the three script parameters defined as {ALERT.SENDTO}, {ALERT.SUBJECT} and {ALERT.MESSAGE}, so if you only plan to send the subject line anyway, you can leave out the third parameter (you can then leave it out from the shell script as well)
- Remember to save the configuration with the Add button
Next, configure your users with Twitter handles.
- Go to Administration – Users, and locate the user(s) that you want to add the Twitter handle, click the username and go to the Media tab of the user
- Click Add in the Media box, and enter the specifications for the user: Type = Twitter DM, Send to = the user’s Twitter handle
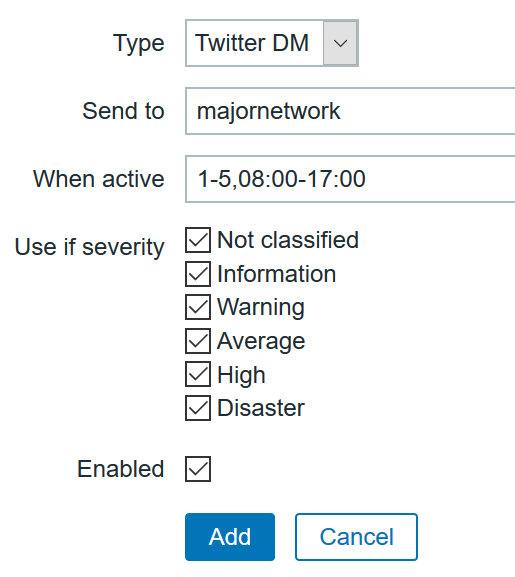
- Note that you can set the “When active” specification to include only working days and hours if you want to limit the sending of the DMs (the default is “1-7,00:00-24:00”, which means all the time); you can also specify the severities for which you want to receive the DMs
- Save the setting with the Add button
- When returning to the Media list page remember to use the Update button to actually save the user configuration changes.
Now you have the user(s) setup to receive DMs, but you still need to configure your actions to use DMs.
- Go to Configuration – Actions
- Open your existing action or create a new one
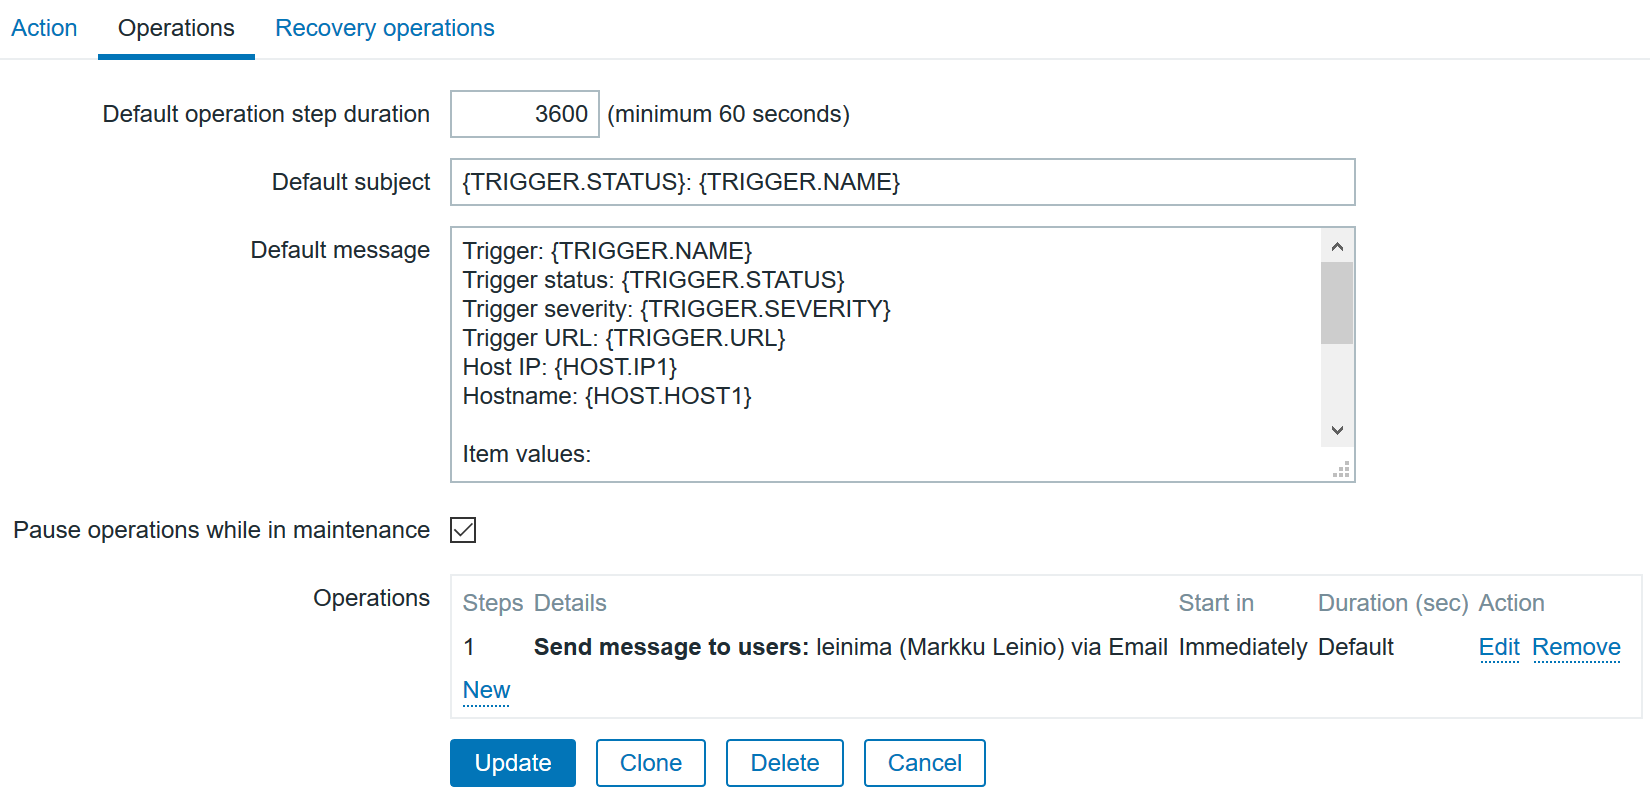
- Go to the Operations tab
- In the Operations list you may already have an operation for sending email, for example:
- You can either edit the existing operation (email sending) to use the “- All -” spefication instead of only sending email (the Send only to configuration), or you can create a new operation that only uses the Twitter DM
- Please note to use the “Add” links and “Update” buttons appropriately to actually save the changes that you have done in the configuration pages! Afterwards also go through the configurations again just to be sure. It seems to be the usual problem for a Zabbix beginner to miss clicking on the crucial Add links to get things saved.
- Also edit the configuration in the Recovery operations tab accordingly if you send recovery messages as well
- Finally you get the Operations defined to something like this:

- This means that in this particular action it will send an email and a Twitter DM, separately.
Finally you can use your favourite way of testing the alerting, like generating CPU load or preventing some agent connection with iptables, to get your alerts tested. “Happy alerting!”